Markers : Subtitles 4 in FCPX

Creating Subtitles with Final Cut Pro X markers
Description
SUGARfx Subtitles 4 provides a simple method to create subtitles from scratch while using Final Cut Pro X and its markers functionality.
This document will guide you through the process of generating the markers and then importing the markers' data to create the final subtitles for your movie.
Preparation
Using the Final Movie
Before you start creating your subtitles, you need to make sure you have your final movie rendered and ready for presentation.
Place the final rendered movie in a brand new timeline where you are going to create the markers. This is the best option to create your markers and a better chance of getting them synchronized and accurate with the movie's dialog.
Using a Compound Clip
Another option is to create a Compound Clip of your current edit, and then create the markers on the timeline that contains the Compound Clip.
This method is a good option if you want to avoid the final rendering of your movie, but it may create problems if you happen to have markers within the edit itself inside the compounded clips.
The problem happens because FCPX exports all of the markers, the ones you create for the subtitles and all of the markers contained within the compound clip. The exported data will contain markers not related to the subtitles, and this will interfere with the decoding of the data when using the SUGArfx Subtitles plugin.
Recommendation
So to make it very clear, our strongest recommendation is to render the final movie and make the markers on a brand new timeline with the final rendered movie in it.
You can always use the alternate option by creating a Compound Clip and avoid the rendering, but you have to be aware of the potential problems explained above and you have to be alert and ready to recognize and solve the problems by removing or deleting stray or forgotten markers within the compounded clips.
Creating Markers in FCPX
Creating markers in FCPX is very simple.
The first thing you need to know is that there are 2 types of markers that we can use, markers without duration (standard markers), and markers that provide a duration (chapter markers).
Both type of markers can be decoded by the Subtitles plugin, however the standard markers without duration will be automatically detected and a custom duration will be applied during the decoding process, while the Chapter markers with duration will use the duration that was applied when creating them.
You can recognize the 2 types of markers, the Standard markers are colored in Blue, and the Chapter markers in Orange color.
Keyboard Shortcut M
To create a marker, position the timeline indicator where you want to create the marker and type the letter M in your keyboard. This automatically creates a standard blue marker in the video, but you need to press the letter M in your keyboard again, to edit its contents.

A little window pops up where you can type the subtitle text that corresponds to the dialog at this moment in the timeline.
If you press the Done button, you will be creating a Standard Blue marker without duration as shown in the graphic above.
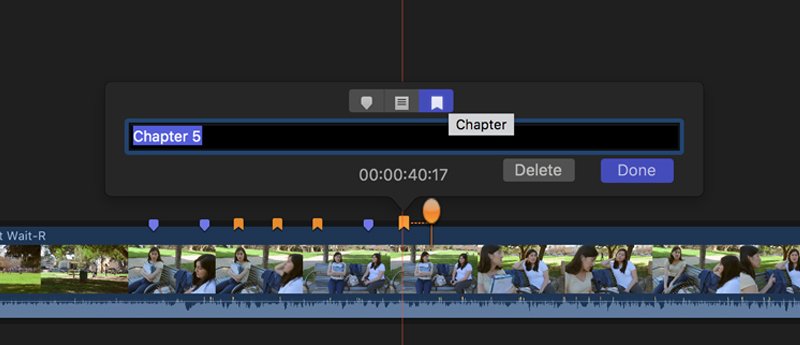
However, if you decide to create a marker with duration (strongly recommended), you should select the Chapter marker icon before you press the Done button.
By doing so, you have the ability to move the Marker Pin to indicate the duration.

You can combine Standard and Chapter markers in the marker creation process, and you can rest assured that the Subtitles plugin will decode them accordingly.
It is strongly recommended that you have a script or the transcript of the dialog already typed and ready to use. This way you can copy and paste each subtitle in your marker data, hence accelerating the process for your convenience.
Special Characters - Style TAGS
When typing the subtitle text you can use Special Characters or Style TAGS that can help you add stylization to the text.
For example, if you want to add bold text to a word, the word needs to be surrounded by the Bold Tag as shown in this example:
To get this :
This is not the best practice
Type this:
This is not the <b>best</b> practice
You can also use the Italic tag: <i>Italic</i>:
To get this :
This is not the best practice
Type this :
This is not the <i>best</i> practice
Or use them in combination:
To get this :
This is not the best practice
Type this :
This is not the <b><i>best</i></b> practice
Finally, another tag that can be used is the ability to add 2 lines of text by typing a <R> whenever should be a "return" in the text. For example:
To get this :
My custom subtitle
should have two lines.
Type this :
My custom subtitle<R>should have two lines.
Export the Markers
To Export the markers, go to the File menu in FCPX and select the option Export XML.
A saving dialog box appears and you can choose to save the file in 2 different versions of XML. Choose either one and save the file.

Using the Subtitles Plugin
You are now ready to apply the Subtitles plugin to your timeline.
Subtitles comes as a Title element that you can place on the top layer above the video in your timeline.

In the inspector window you will see the parameters of Subtitles. Go to the Import Settings and select the Input Format as FCPX XML (Markers), then click on the Import File button to import the exported markers in XML format.

The Subtitles should appear in the viewer and synchronized with the markers that you've created.
At this point, you can go ahead and customize the look and position of the subtitles and render your final movie for distribution or presentation.
Technical Support
Our Technical support team is available to answer your questions via e-mail and should respond as soon as possible. (support@sugarfx.tv)
Don't have it yet? - Download and Try.
You can download and install the free trial as part of FxFactory.

|
|
© Copyright 2014 SUGARfx |


![]()
Tutorials
![]()
Works In:


