Markers : Subtitles 4 in Premiere Pro

Creating Subtitles with Adobe Premiere Pro markers
Description
SUGARfx Subtitles 4 provides a simple method to create subtitles from scratch while using Adobe Premiere Pro and its markers functionality.
This document will guide you through the process of generating the markers and then importing the markers' data to create the final subtitles for your movie.
Preparation
Using the Final Movie
Before you start creating your subtitles, you need to make sure you have your final movie rendered and ready for presentation.
Place the final rendered movie in a brand new timeline where you are going to create the markers. This is the best option to create your markers and a better chance of getting them synchronized and accurate with the movie's dialog.
Using a Nested Sequence
Another option is to create a Nested Sequence of your current edit, and then create the markers on the timeline that contains the Nested Sequence.
This method is a good option if you want to avoid the final rendering of your movie, but you have to be careful during the export of your markers and make sure only the markers you've created related to the subtitles is exported, otherwise you will not get the results you expect.
Recommendation
So to make it very clear, our strongest recommendation is to render the final movie and make the markers on a brand new timeline with the final rendered movie in it.
You can always use the alternate option by creating a Nested Sequence and avoid the rendering, but you have to be aware of the potential problems that may occur if the incorrect markers are exported by mistake as explained above.
Creating Markers in Premiere Pro
Creating markers in Adobe Premiere Pro is very simple.
You can create markers right in the timeline or in the clip. Either option should be fine but we recommend creating them in the timeline for better flexibility.
There are several types of markers in Adobe Premiere Pro. The markers you should use are the default markers also known as: Comment Markers
Keyboard Shortcut M
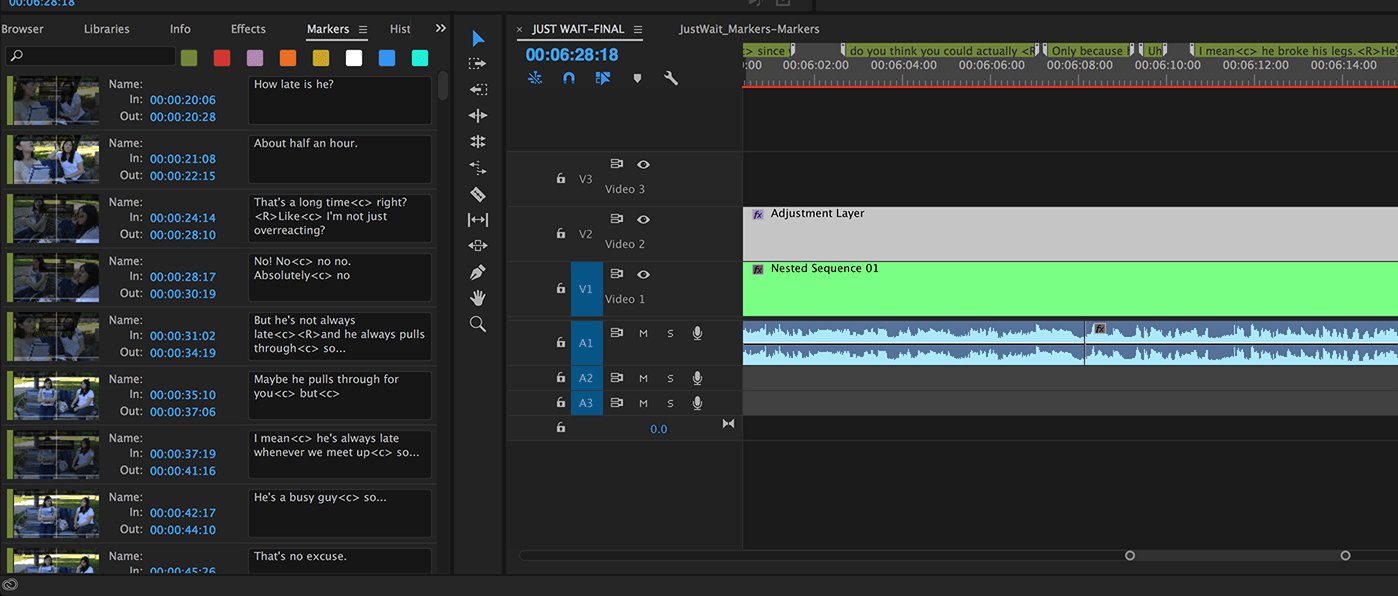
First, make sure your timeline panel is active (there should be a blue line around its window) and that you are not selecting any clip in there. Also, make your Markers panel visible in order to see the markers while you are creating them.
To create a marker, position the timeline indicator where you want to create it and type the letter M in your keyboard. This automatically creates a marker in the timeline, and you can see the first thumbnail appearing in the Markers panel.
You can type your text in the markers panel and adjust the Out duration, or you can type the letter M in your keyboard again to bring up the dialog box to modify the marker data. Either process should work fine to create the markers.

If you prefer to modify the marker data right in the timeline instead of going back to the markers panel, then you want to type the letter M in your keyboard twice to bring up the dialog box.
Here you can type the text in the Comments section and modify the duration as desired.
Accept your changes to see the marker in the timeline.

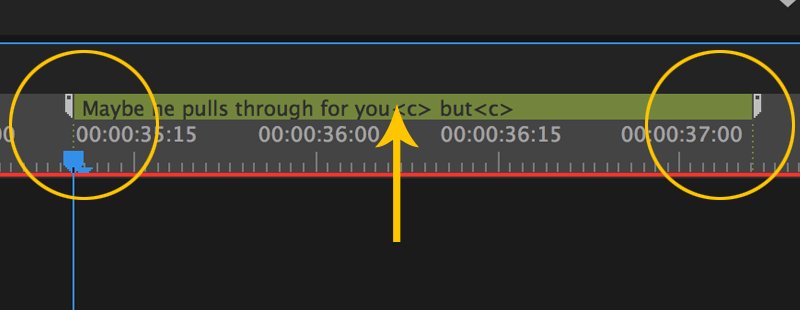
Right in the timeline you can modify the duration of the marker by pulling either side of the marker to fit perfectly with the dialog in the movie, and you can grab the marker from its center to move the marker in either direction of the timeline.
It is strongly recommended that you have a script or the transcript of the dialog already typed and ready to use. This way you can copy and paste each subtitle in your marker data, hence accelerating the process for your convenience.
At the end of the process you'll end up with all of your markers in the timeline bar and the complete list of markers with thumbnails in the Markers panel as shown here.
Special Characters - Style TAGS
When typing the subtitle text you can use Special Characters or Style TAGS that can help you add stylization to the text and also format your text for perfect decoding.
Adobe Premiere exports the markers' data as a CSV format (comma separated value), therefore you cannot use commas ( , ) in the subtitle text because they will not be decoded properly.
We have implemented a way to overcome that deficiency in the CSV format by including a tag that represents the comma character if you need to use it.
The tag for the replacement of the comma is: <c>
Here are some examples of the several tags that can be used in Adobe Premiere.
To create a subtitle that contains a comma:
To get this :
Oh my dear, this is nice!
Type this:
Oh my dear<c> this is nice!
If you want to add bold text to a word, the word needs to be surrounded by the Bold Tag as shown in this example:
To get this :
This is not the best practice
Type this:
This is not the <b>best</b> practice
You can also use the Italic tag: <i>Italic</i>:
To get this :
This is not the best practice
Type this :
This is not the <i>best</i> practice
Or use them in combination:
To get this :
Please, this is not the best practice
Type this :
Please<c> this is not the <b><i>best</i></b> practice
Finally, another tag that can be used is the ability to add 2 lines of text by typing a <R> whenever should be a "return" in the subtitle text. For example:
To get this :
My custom subtitle
should have two lines.
Type this :
My custom subtitle<R>should have two lines.
Export the Markers
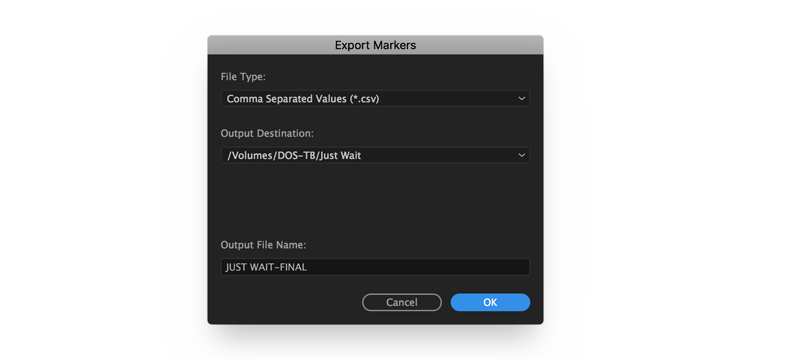
To Export the markers, go to the File menu in Adobe Premiere Pro and select the option Export and then the submenu Markers.
An Export Markers dialog box appears and you can choose to save the file in different File Types.
Select the Comma Separated Values (*.csv) in the File Type, select the Output Destination in your hard drive, and type in the Output File Name and press OK to accept and save the file.
Using the Subtitles Plugin
You are now ready to apply the Subtitles plugin to your Premiere Pro timeline.
Create an Adjustment Layer and place it on the top track of your timeline and adjust the duration to fit the entire length of the video underneath.
Look for the Subtitles plugin in the Effects Video category, select it and drag it onto the Adjustment Layer.
In the Effect Controls window you will see the parameters of Subtitles.
Go to the Import Settings and select the Input Format as Premiere Markers (CSV), then click on the Import Text File button to import the previously exported markers in CSV format.

The Subtitles should appear in the viewer and synchronized with the markers that you've created.
At this point, you can go ahead and customize the look and position of the subtitles and render your final movie for distribution or presentation.
Technical Support
Our Technical support team is available to answer your questions via e-mail and should respond as soon as possible. (support@sugarfx.tv)
Don't have it yet? - Download and Try.
You can download and install the free trial as part of FxFactory.

|
|
© Copyright 2014 SUGARfx |


![]()
Tutorials
![]()
Works In:


