Revolve 360
USER MANUAL
Description
Revolve 360 is an effect that provides the capabilities of editing, animating and manipulating the equirectangular video and still images.
Revolve 360 is an Editor's tool where the Editor becomes the Director and controls the framing and viewing of a specific area of the 360° panorama.
By using controls for the X, Y and Z axis as well as the distorsion effects the Editor/Director is able to communicate ideas or tell a story, from the same image and from different angles.
With Revolve 360 you can tell the story from any angle that you want, never missing the action or the reaction in your scene.
Revolve 360 is not a VR option where the user interacts with the video. Revolve 360 is an Editor's tool to allow the control of the framing or animation of the virtual world in 360°.
What is an Equirectangular image?
Revolve 360 requires an equirectangular image to work at its best. These images have been known as Spherical panoramas mainly used for virtual tours, real estate sales or interactive visualization.
The Equirectangular image or video is shot with a super wide angle camera lens, capable of capturing the surrounding area up to 360° from side to side and from top to bottom, or by using a rig of several cameras and stitching the images together to create one frame. (Revolve 360 DOES NOT do the stitching of your footage)
These are also known as spherical images (check them out here: Spherical Images ).
When shooting video with a 360° view, you are able to record the whole world around you in one single shot, capturing the main character and the reaction of an audience during a special event, or the bride and groom kissing while the family rejoyce, or the whole city moving around you while driving on the streets.
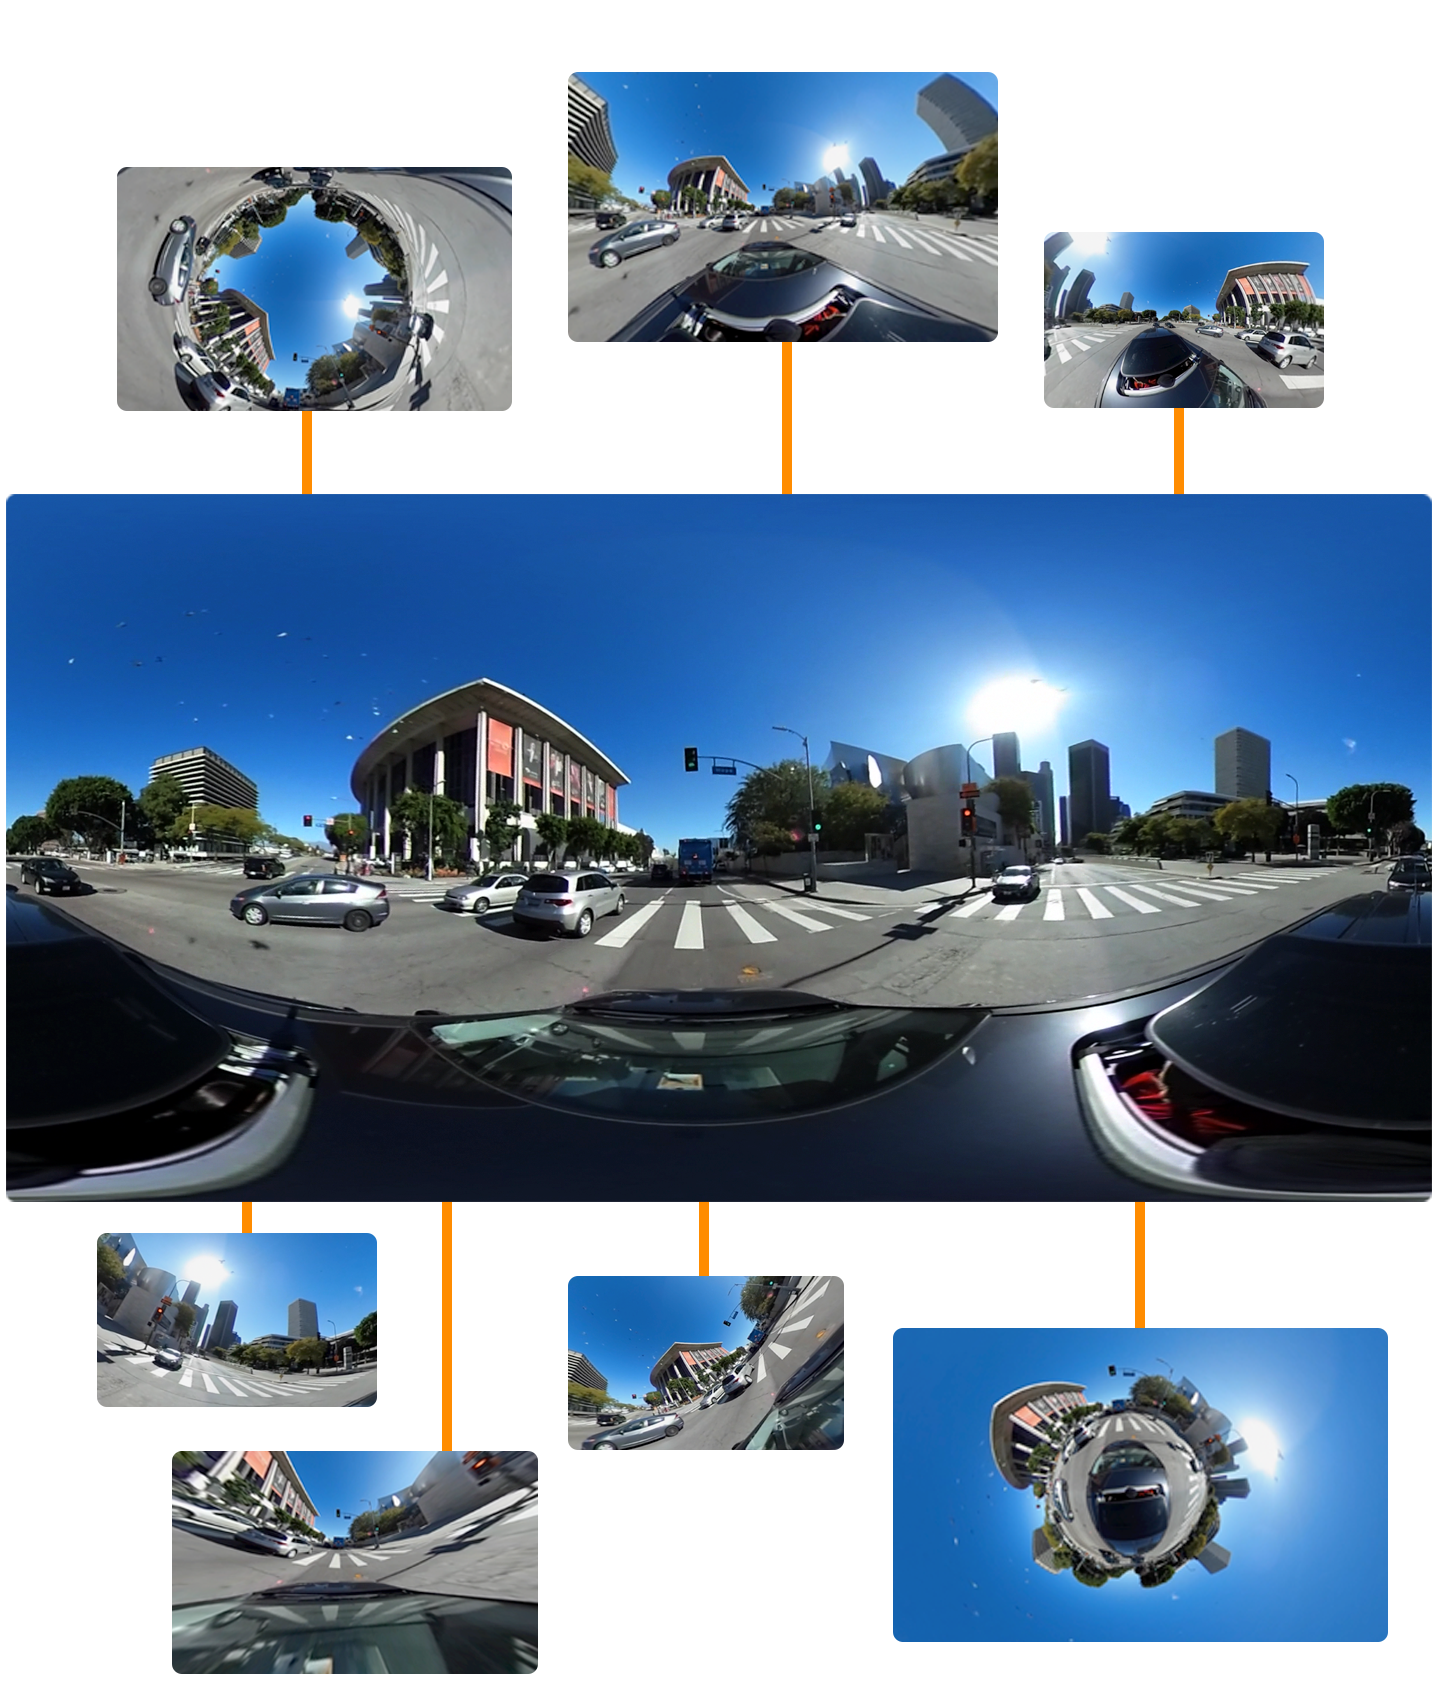
Revolve 360 takes advantage of everything that gets recorded by the camera in the same image and at the same time, making it ideal for the director and the editor to never have the excuse to miss a shot because that angle was out of the frame.
With Revolve 360 you can turn in any direction and point where the action is. You can also dolly, zoom or spherify the image to your liking while editing, and show the action and the reaction without missing a frame.
Several cameras are now available for the video enthusiast and professionals, capable of capturing complete spherical panoramas in several formats, sizes and resolutions. Some of them can be checked out here: Kodak SP360, Bublcam, RICOH THETA, 360Heros, Nikon Keymission360, Sphericam, and there are many others not mentioned here, plus we should expect more coming out soon.
USING 360 FOOTAGE IN FINAL CUT PRO X 10.4.X AND LATER
Since the addition of 360 capabilities to Final Cut Pro X, Revolve 360 has been updated to include an additional element that can be found in the Titles browser.
With this additional element you can use 360 video footage on your Standard projects.
Be aware that 360° projects are usually created automatically by adding 360° footage to a new empty project.
Also, 360° footage is treated differently than 2D footage inside FCPX and it is not fully compatible with Revolve 360.
You can modify the 360° footage in FCPX to be treated as non-360, and then be able to create standard projects with it (non-360 projects).
Revolve 360 should be used on Standard projects with Standard Equirectangular footage.
First, you need to set the 360° projection mode of your footage to be None.
You can recognize when your footage is set as a 360 footage because it contains a little round icon at the top left of its thumbnail. (see graphic below).
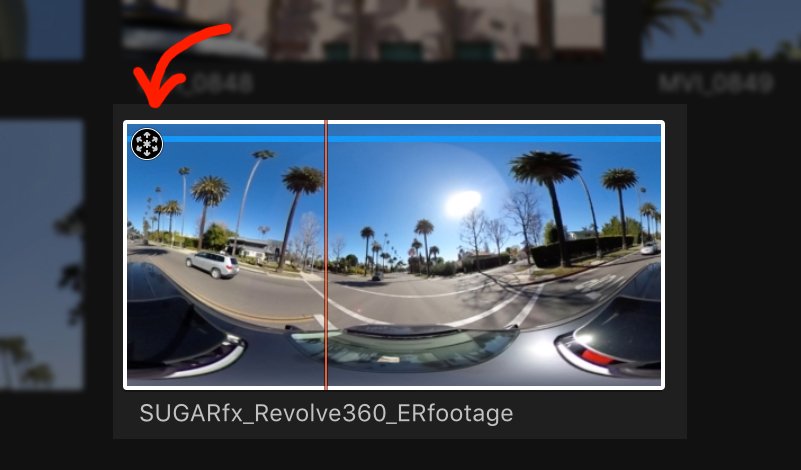
You can set the footage in FCPX to have the 360° Projection Mode as Equirectangular or none.
If you set it to None, the icon will disappear and the footage will be treated by FCPX as a standard video clip (not 360).How to use the Title or the Effect element.
Set the 360 Projection Mode of your footage to NONE, and create a Standard project.
None : will be usable when you create a Standard project (This is not a 360° project).
NOTE: If you set the projection mode to Equirectangular, this footage will be usable when you create a 360° project, but not compatible to be used with Revolve 360.
Our best recommendation when using
Revolve 360 is to create a Standard project
at the final size that you want to output.
– For example if you're using 4k footage, and your final output will be 1920x1080, set the project at the output size of 1920x1080, add your footage and then add the title element on the top above your footage.
PRODUCTION WORKFLOW OPTIONS:
1. Working with a Standard Project : You can freely use the Title or the Effect element of Revolve 360 on your footage whenever you are using Equirectangular video footage that has its Projection Mode set to None. (Using the Title element provides a bit more versatility).
2. Working with a 360° Project : If you must use a 360° project because you need to add titles or images, then we recommend that you render your final 360° video with your graphics and titles to your hard drive in its original size, and then import the rendered movie into FCPX and set its projection mode to None. Add this footage to a Standard project where you can safely use Revolve 360 (see option 1 above).
PLACING THE TITLE ELEMENT IN YOUR TIMELINE:
The Title element should be placed in the top track above the footage in your timeline.

User Interface
Revolve 360 is available for Final Cut Pro X, Motion, After Effects and Adobe Premiere Pro, and its interface is the same across the multiple host applications.
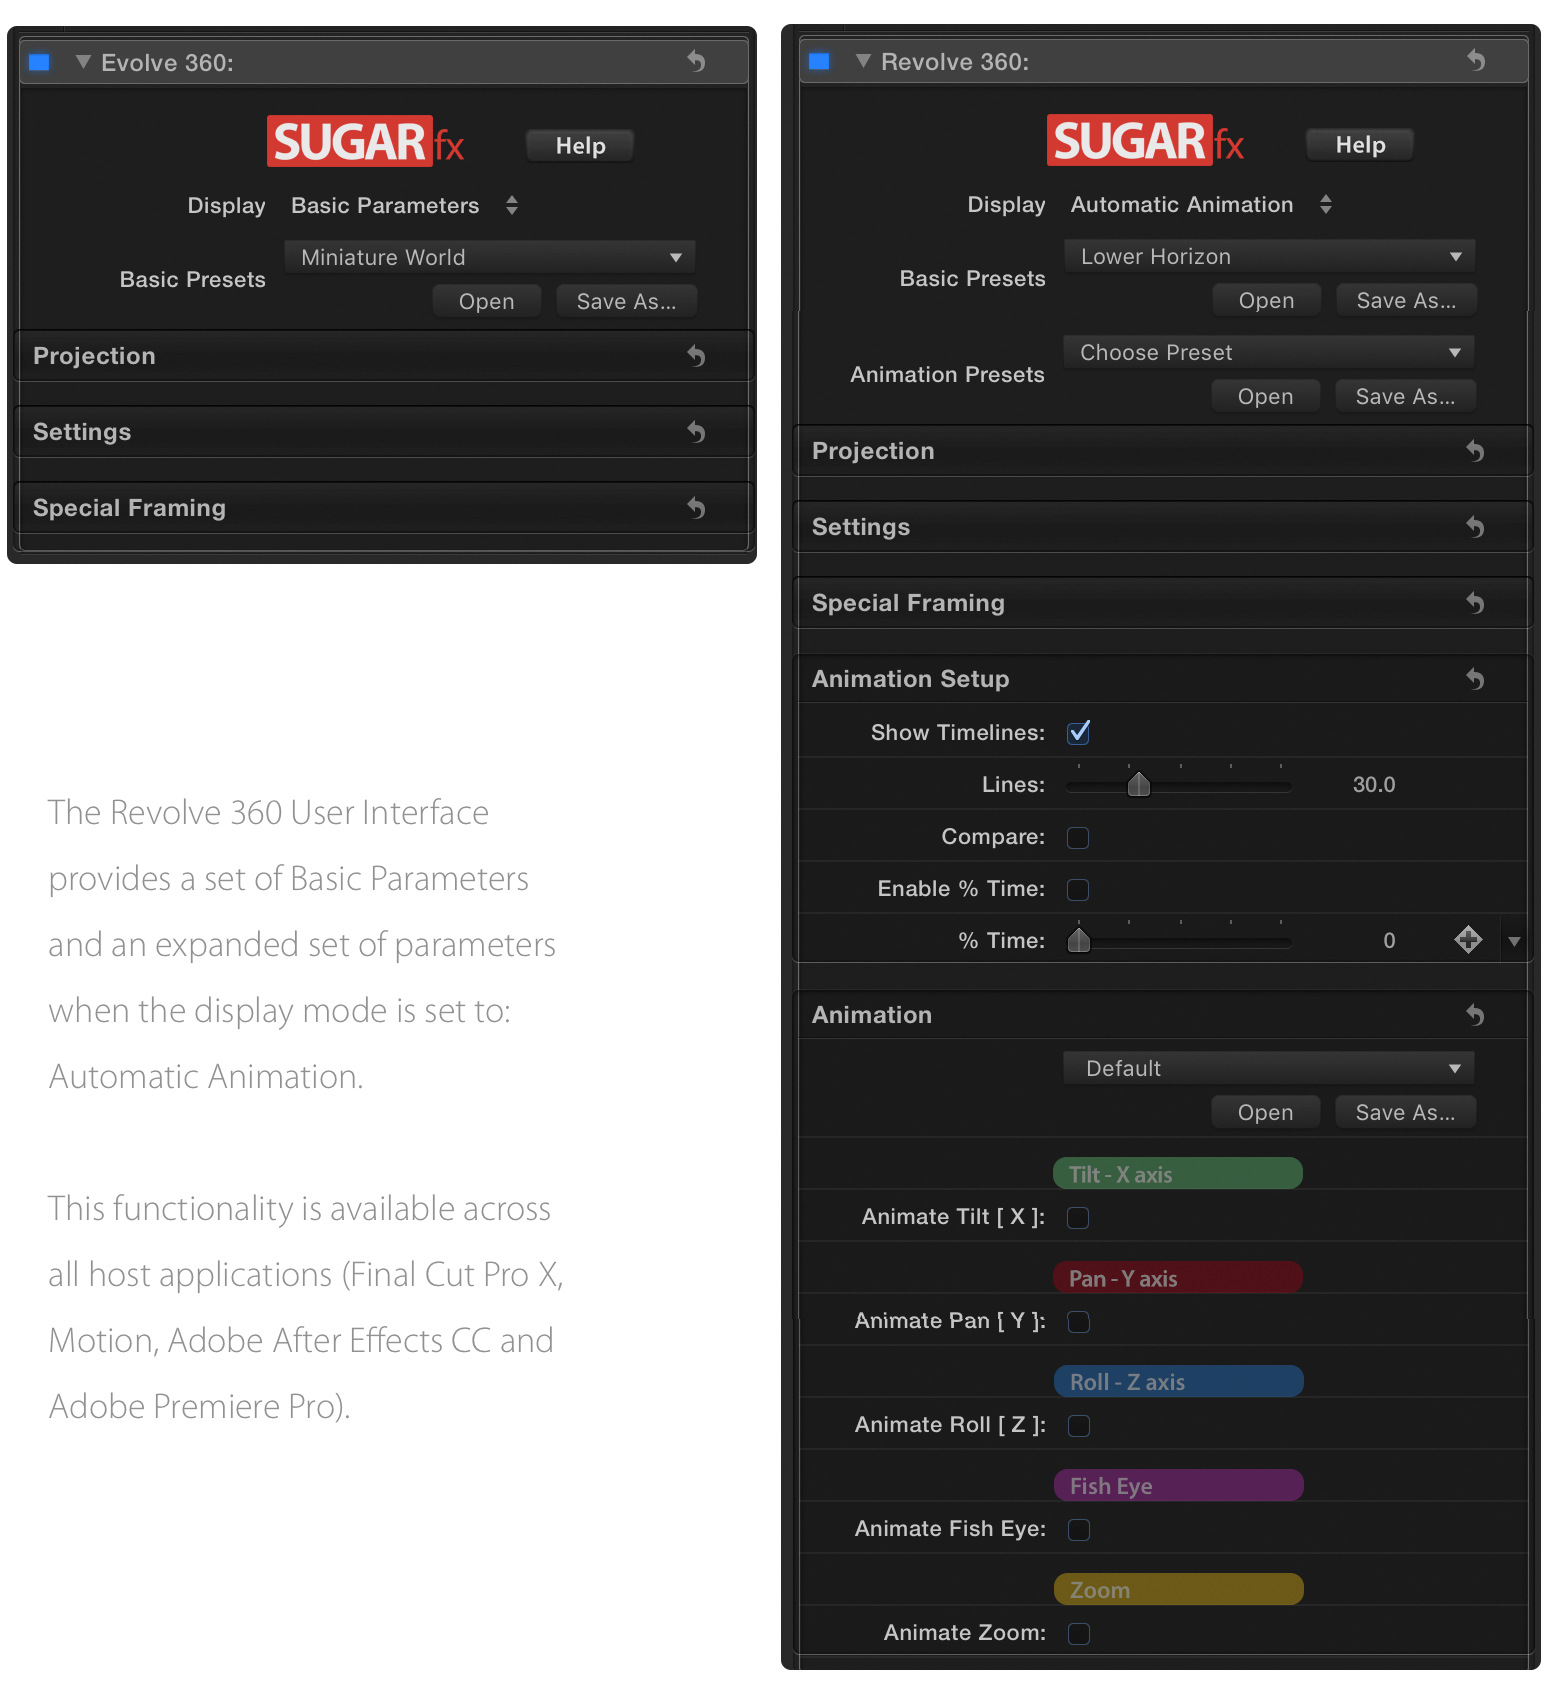
The interface offers a basic set of parameters that can be used to set the scene up.
Or you can keyframe the basic parameters by hand if you want to get the most control during a desired animation.
If you want to have a quick way to animate, there is an Automatic Animation Display mode which provides additional parameters to get the animation done quickly and easily.
Revolve 360 also comes with a Preset system where you can choose one to get you started, or create your own for later use or to share with other users.
Parameters
The SUGARfx Logo and Help button : Press this button to access the help page in the default browser of your computer.
Display : This menu displays the parameters available for the Basic setup mode and for the Automatic Animation mode.
Basic Presets : This drop down menu provides several built-in setups that you can use to get started. You can save, reuse and share presets with other Revolve 360 users.
Animation Presets : This drop down menu provides several built-in animation setups that you can use to get started to create your own. You can save, reuse and share presets with other Revolve 360 users.
Projection

Flip : Flips the image horizontally.
Flop : Flops the image Vertically.
Projection : Defines how we view the image which is projected onto the virtual sphere. Front is usually the normal straight up way, but you can definitely choose to view it in the other direction.
Resolution : Defines the quality of the virtual sphere affecting the projection of the image onto it. Use the lower setting while working on systems that may have difficulty in handling a higher quality, but remind yourself to increase the resolution at the time of final rendering.
Settings
These parameters are the basic setup for both the Manual and the Automatic Animation functions.
When the Automatic Animation (Display) is selected, these settings play the role of the starting keyframes.
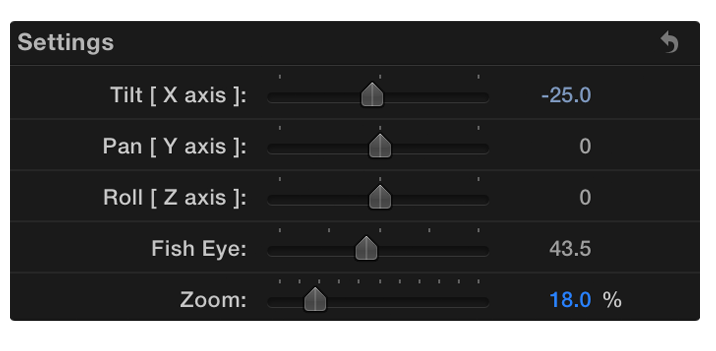
Tilt [ X axis ] : Rotates the camera in the vertical direction or up and down (along the X axis).
Pan [ Y axis ] :Rotates the camera in the horizontal direction or side to side (along the Y axis).
Roll [ Z ] : Rotates the camera sideways in the direction of the camera view (along the Z axis).
Fish Eye : Simulates the distorsion of a lens.
Zoom : Simulates the zooming effect of a lens.
Special Framing
This section provides controls to move the virtual camera inside the virtual sphere, as well as scaling the projection of the image from the bottom-up or from the top-down.

Dolly : Moves the virtual camera forwards or backwards making the projected image appear larger or smaller.
Keep in mind that the quality of the image may decrease if the viewing gets too close into an area of the virtual sphere due to the lack of quality and resolution of the complete image.
Frame Horizontal : Moves the virtual camera in a horizontal direction.
Frame Vertical : Moves the virtual camera in a vertical direction.
By moving the camera in any direction you may see the virtual sphere limits creeping into the screen and revealing the transparency of the background.
Scaling In : This parameter controls the top area of the projected image. A value lower than 1 will start to reduce the vertical size of the projected image from the top-down, and its corresponding mask that reveals the transparency of the background.
Scaling Out : This parameter controls the bottom area of the projected image. A value higher than 0 will start to reduce the vertical size of the projected image from the bottom-up, and its corresponding mask that reveals the transparency of the background.
Video transitions can easily be achieved while animating either one or both of the Scaling parameters and setting the Video Alpha to .
Video Alpha : This drop down menu provides two options for when the Scaling In or Scaling Out are being modified. The Repeat Border Pixels option will do just what its name implies, the visible border will be repeated to replace the alpha, and the Enable Alpha Channel enables the use of an Alpha channel when the Scaling is changed. (This option is not available in any of the Adobe applications).
Animation Setup
This group of parameters provide control of the auto-animation timeline by enabling the display on the screen and being able to animate stills or advanced animation techniques.
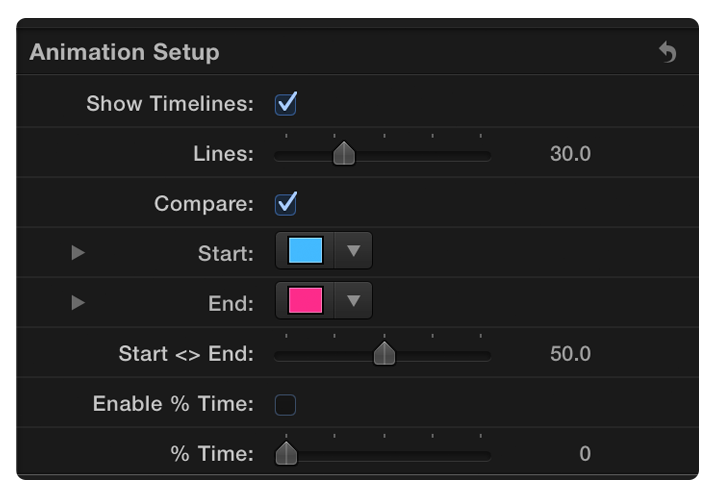
Show Timelines : This button enables the timeline display on the screen.
Lines : Controls the thickness of the lines for the Timeline displayed on the screen.
Compare : By enabling this button you will be able to see the start and end framing of your video.
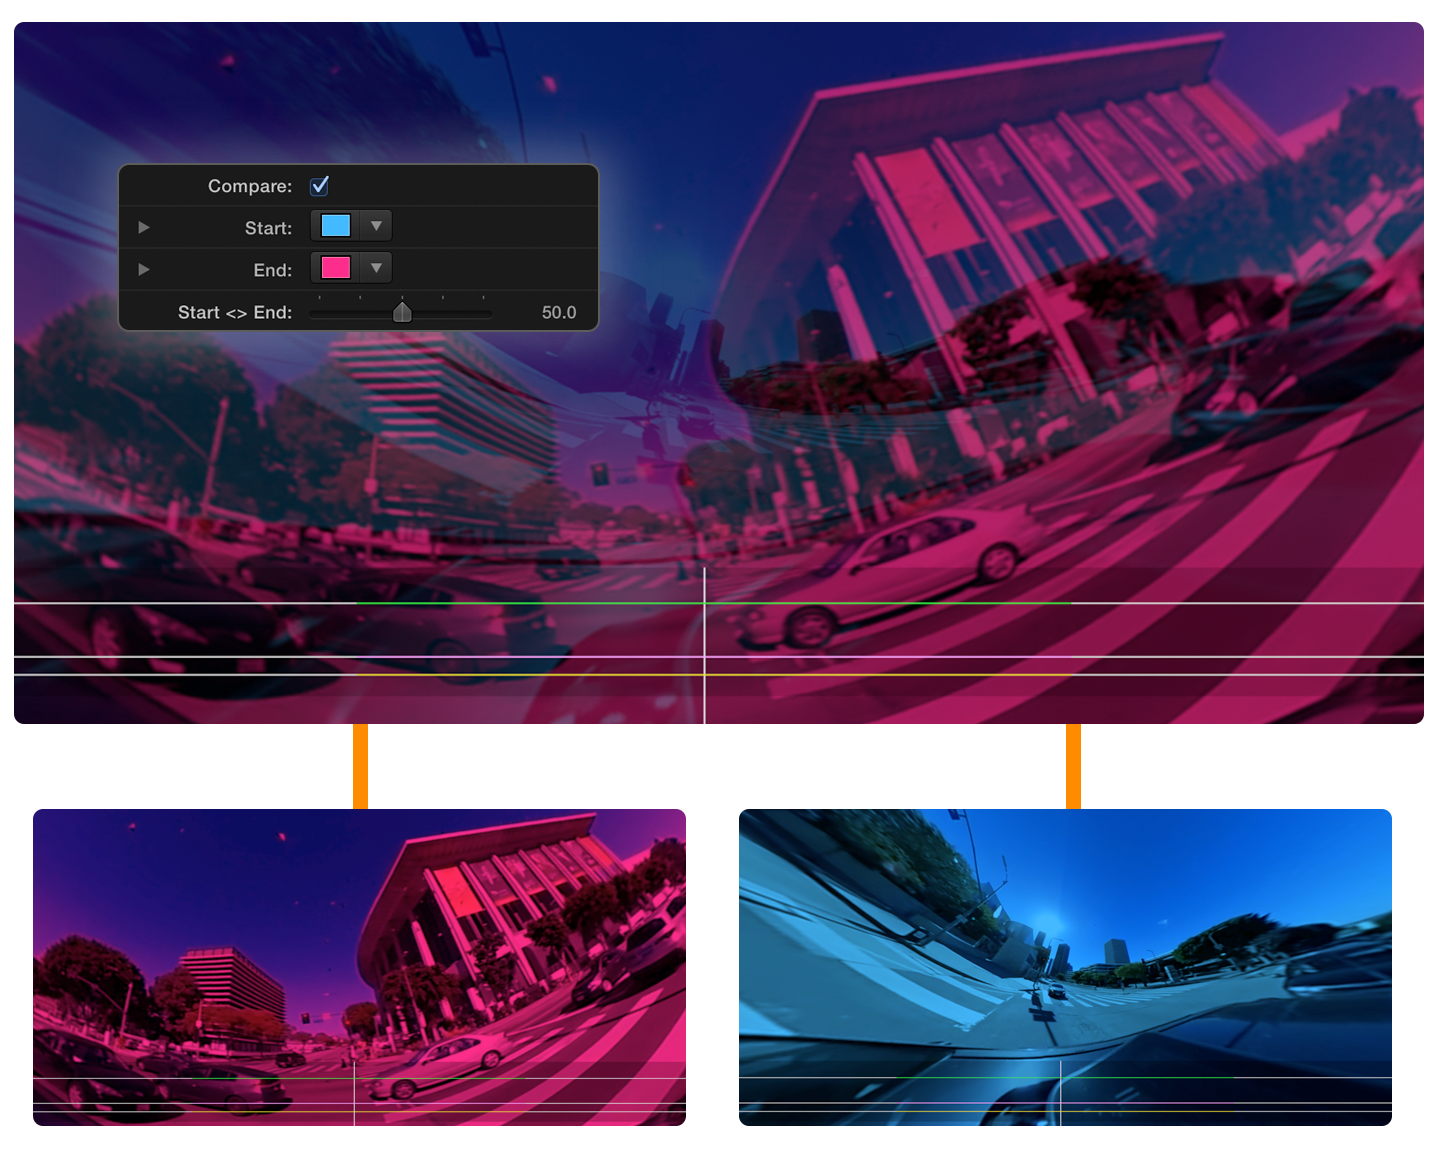
Start : Sets the color of the Start image when the Compare button is enabled.
End :Sets the color of the End image when the Compare button is enabled.
Start <> End: By moving this slider you will be able to see the Start and End image transition to compare how the animation will start and how it will end.
Enable % Time : This button enables the use of the % Time parameter.
% Time : The length of the on-screen timeline is considered to be 100%. Use this parameter to control the location of the timeline or to control the timing of your auto-animation.
This parameter is useful when adding an auto-animation preset to a still image in any of the Adobe applications, you simply have to add a keyframe at the beginning with a value of 0% and another keyframe at the end with the value of 100% to complete the whole animation.
This parameter can be used as an advanced mode of animation to control the timeline in any application and with video or still images.
Animation
The parameters in this section control the end keyframe of the Automatic Animation.
The starting keyframe is controled by the Settings section above.

Presets : This section contains its own Presets menu where you can save and reuse setups affecting only this section. Use this presets to create your own end of animation when using the auto-animation display mode.
Tilt - X axis (color coded in Green)
Animate Tilt [ X ] : Use this button to enable the Tilt animation ( along the X axis ).
Tilt [ X axis] : This parameter corresponds to the end value the Tilt animation.
% Duration : Enter the duration of the animation in terms of percentage. You can see the visual feedback color coded in Green in the on-screen timelines.
% Time : Controls the starting time in terms of percentage. You can see the visual feedback in the on-screen timelines.
Behavior : This drop down menu provides several end behavior options.
None means that the animation ends and stays in place.
Loop means that the animation ends and starts all over again from its initial value repeating forever.
Mirror Loop means that the animation will loop at the end in reverse, back and forth and forever.
Mirror Loop Once means that the animation will loop at the end in reverse just one time.
Motion : This drop down menu controls the animation curve or motion interpolation between the start and the end of the animation. Linear provides a constant speed between start and end and ease provides a smooth landing or smooth curve.
Pan - Y axis (color coded in Red)
Animate Pan [ Y ] : Use this button to enable the Pan animation ( along the Y axis ).
Pan [ Y axis] : This parameter corresponds to the end value the Pan animation.
% Duration : Enter the duration of the animation in terms of percentage. You can see the visual feedback color coded in Red in the on-screen timelines.
% Time : Controls the starting time in terms of percentage. You can see the visual feedback in the on-screen timelines.
Behavior : This drop down menu provides several end behavior options.
None means that the animation ends and stays in place.
Loop means that the animation ends and starts all over again from its initial value repeating forever.
Mirror Loop means that the animation will loop at the end in reverse, back and forth and forever.
Mirror Loop Once means that the animation will loop at the end in reverse just one time.
Motion : This drop down menu controls the animation curve or motion interpolation between the start and the end of the animation. Linear provides a constant speed between start and end and ease provides a smooth landing or smooth curve.
Roll - Z axis (color coded in Blue)
Animate Roll [ Z ] : Use this button to enable the Roll animation ( along the Z axis ).
Roll [ Z axis] : This parameter corresponds to the end value the Roll animation.
% Duration : Enter the duration of the animation in terms of percentage. You can see the visual feedback color coded in Blue in the on-screen timelines.
% Time : Controls the starting time in terms of percentage. You can see the visual feedback in the on-screen timelines.
Behavior : This drop down menu provides several end behavior options.
None means that the animation ends and stays in place.
Loop means that the animation ends and starts all over again from its initial value repeating forever.
Mirror Loop means that the animation will loop at the end in reverse, back and forth and forever.
Mirror Loop Once means that the animation will loop at the end in reverse just one time.
Motion : This drop down menu controls the animation curve or motion interpolation between the start and the end of the animation. Linear provides a constant speed between start and end and ease provides a smooth landing or smooth curve.
Fish Eye (color coded in Purple)
Animate Fish Eye : Use this button to enable the Fish Eye animation.
Fish Eye : This parameter corresponds to the end value the Fish Eye animation.
% Duration : Enter the duration of the animation in terms of percentage. You can see the visual feedback color coded in Purple in the on-screen timelines.
% Time : Controls the starting time in terms of percentage. You can see the visual feedback in the on-screen timelines.
Behavior : This drop down menu provides several end behavior options.
None means that the animation ends and stays in place.
Loop means that the animation ends and starts all over again from its initial value repeating forever.
Mirror Loop means that the animation will loop at the end in reverse, back and forth and forever.
Mirror Loop Once means that the animation will loop at the end in reverse just one time.
Motion : This drop down menu controls the animation curve or motion interpolation between the start and the end of the animation. Linear provides a constant speed between start and end and ease provides a smooth landing or smooth curve.
Zoom (color coded in Yellow)
Animate Zoom : Use this button to enable the Zoom animation.
Zoom : This parameter corresponds to the end value the Zoom animation.
% Duration : Enter the duration of the animation in terms of percentage. You can see the visual feedback color coded in Yellow in the on-screen timelines.
% Time : Controls the starting time in terms of percentage. You can see the visual feedback in the on-screen timelines.
Behavior : This drop down menu provides several end behavior options.
None means that the animation ends and stays in place.
Loop means that the animation ends and starts all over again from its initial value repeating forever.
Mirror Loop means that the animation will loop at the end in reverse, back and forth and forever.
Mirror Loop Once means that the animation will loop at the end in reverse just one time.
Motion : This drop down menu controls the animation curve or motion interpolation between the start and the end of the animation. Linear provides a constant speed between start and end and ease provides a smooth landing or smooth curve.
REVOLVE 360 BASIC Presets

Technical Support
Our Technical support team is available to answer your questions via e-mail and should respond as soon as possible. (support@sugarfx.tv)
Help
The Help file in PDF format or web page URL is available when you open the FxFactory application and press on the Help button under the icon of the theme element.
Support
Please visit our web site (http://www.sugarfx.tv) for possible answers to your technical support issues, or visit our YouTube channel at (http://www.youtube.com/sugarfxtv) where you may also find a tutorial that will help you find the answer to your question.
Known Issues
(1) When using Adobe Premiere or Adobe After Effects, still images need to be animated by enabling the % Time parameter.
(2) When using Adobe Premiere or Adobe After Effects, the Repeat Border Pixels is not available.
(3) When using Adobe Premiere, the Scaling In and Scaling Out values differ slightly to the other host applications, therefore when using a preset there will be transparent circles on the top and/or the bottom of the virtual sphere and you'll need to adjust the scaling parameters accordingly.
(4) Some systems using Adobe products may have problems using the Automatic Animation presets. If this happens you can use the Enable % Time and % Time parameters to force the automatic animation from 0 to 100.
(5) In Final Cut Pro X 10.4.x and later, when the Effect is applied to a 360° footage in a 360° project, the application may either crash or get extremely slow. If this happens, you can undo or remove the Effect as soon as possible, and then follow the instructions to create a Standard project instead of a 360 Project.
There are no more issues that we are aware of, at the time of release of this product.
Don't have it yet? - Download and Try.
You can download and install the free trial as part of FxFactory.
|
© Copyright 2006-2016 SUGARfx |
