Subtitles 4
USER MANUAL
Description
SUGARfx Subtitles 4 provides the necessary tools to add burn-in subtitles to your film by using some of the industry standard formats as well as having the capability to Export Subtitle data in several formats to be used in other applications.
SUGARfx Subtitles 4 is NOT a replacement for professional subtitles, government or industry standard requirements, but a tool to help you add subtitles to your movies.
You can add hundreds and even thousands of subtitles to your finished movie when using SUGARfx Subtitles, simply by importing the compatible time coded text format, choosing the corresponding input format and pressing the play button in the timeline.
Multiple Host Applications
Subtitles is available in Final Cut Pro X, Adobe Premiere Pro, Motion and After Effects.
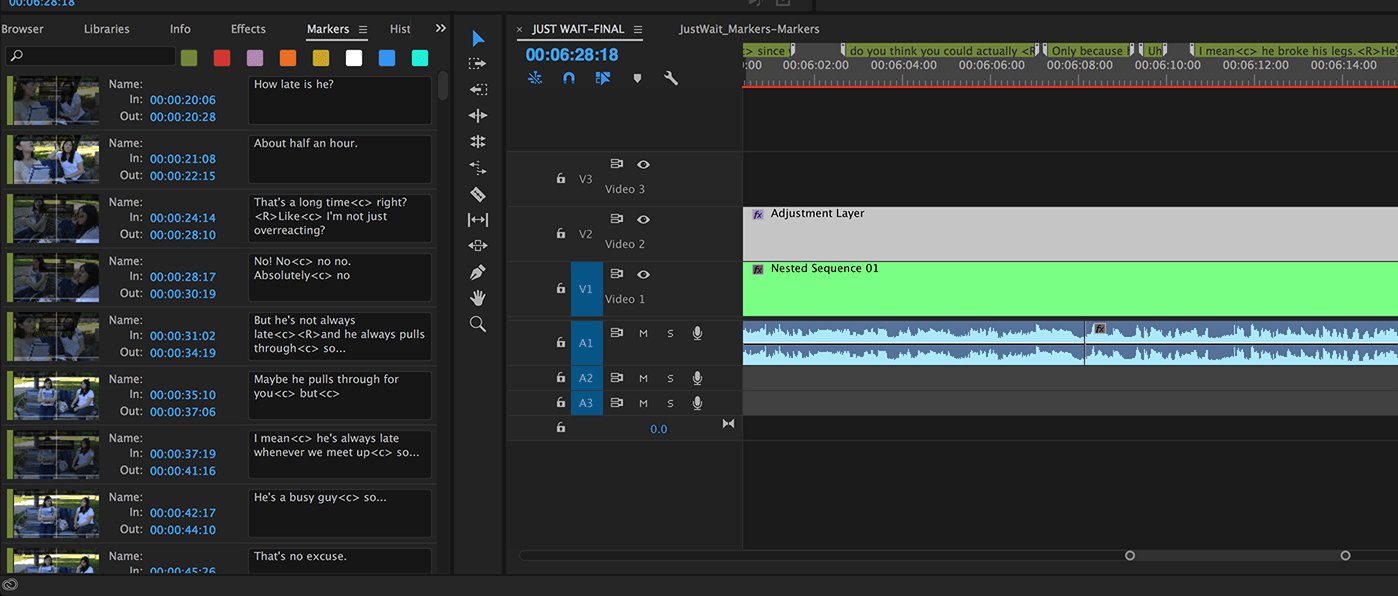
Below you can see a couple of screen shots from FCPX and Adobe Premiere Pro.


Click to see a larger image
Workflow
The process of creating subtitles may be tedious and take a long time to complete.
If you do not have a typewritten script, the transcript of your movie has to be typed by a real person listening to the audio of the final movie, and marking down the time code for each sentence while typing the dialog.
This is probably the most reliable method for the creation of accurate subtitles, but it is also the most tedious and may take a long time to complete, depending on the amount of dialog and the length of the final movie.
– It is strongly recommended that the subtitles be done as the last operation in your editing, by rendering the final movie and creating the subtitles that rely on the time code and dialog of the finished movie.
– Any additional changes or edits to the final movie will interfere with the time code accuracy and placement of the subtitles. –No further editing should be done after creating the subtitles–
For the creation of subtitles there are several tools out there that can help you speed up the process, some are free applications, others are services based on the cloud, and others are private companies offering the services and the translation of the dialog, etc., but there is no tool that can do that for you automatically and/or accurately.
Subtitles accepts several standard formats for import. These formats will be decoded by Subtitles and then place each subtitle entry in your timeline according to the time code provided in the file.
CREATING MARKERS
SUGARfx Subtitles 4 offers a method of creating subtitles from scratch if you are an editor working in any of the following applications.
For FCPX users : MARKERS : Using Final Cut Pro X
For Adobe Premiere Pro users : MARKERS : Using Adobe Premiere Pro
In Adobe Premiere you can create Markers for each piece of dialog in your movie. The application automatically registers the time code where you create the marker, but you have to indicate the duration of each marker. When finished creating the markers, you can export them as a CSV (comma separated value) format ready to be used by the Subtitles 4 plugin.
A similar process can be used in Final Cut Pro X, where you create markers for each subtitle entry, and export the project as an XML file. The exported XML file will be used by Subtitles 4 to decode the data and place each subtitle entry in the corresponding time code previously indicated by each marker.
Editing can be done in the markers placed on your timeline, however they need to be exported again, and then be imported by Subtitles 4 one more time to make those changes visible in the plugin.
DATA EXCHANGE
SUGARfx Subtitles 4 also offers several ways to exchange data between applications and standard formats, like exporting the data from FCPX to Adobe Premiere Pro using the markers, or viceversa, and several other options that can be useful while creating the subtitle data.
Help ( the User Manual )
When clicking on the SUGARfx logo you will be directed to a help file. - You can also access the help file when using the FxFactory application, or download it directly from our web site.
Parameters
Thanks to the OSC functionality of FxFactory, Final Cut Pro X displays some of the most used parameters under the viewer window for quick and easy access, such as the Presets, the Info, input format, font and Export data commands.
Presets : Create your own setups and save them for future use, or open a previously prepared setup. You can save presets and exchange them with your colleagues when using the same version of the plug-in and across all supported hosts.
Info : The Info button is enabled by default. It provides information about the subtitle data encoded that is being displayed in the timeline and helps in the identification of possible typographical errors, time code miss match or misplacement of subtitles.

When the Info button is on, the Canvas window or Viewer shows an overlay on top of the subtitle generator with the approximate Running Time Code (RTC), the current frame in time, the total number of subtitles decoded, the raw IN and OUT time code data for the previous, next and current subtitle, and the corresponding Subtitle text.
Attention : The Running Time Code may not be completely accurate and show some discrepancies with the actual time code of the project. This is simply displayed in the info screen for reference and approximation. The actual time code of the timeline in the software should be the accurate reference for you.
The Info button also displays a special information box when the function menu is set to Export, allowing you to see the hard drive location and the file name and format selected before saving.

Select Function : Subtitles 4 comes with two functions that can be selected in this drop-down menu.
The SUBTITLES [ Import / Create ] function is used whenever you need toimport or create subtitles for the movie and all of the corresponding parameters will be available throughout the parameters' list.
The EXPORT [ Data Exchange ] function is used whenever you want to export or convert the imported subtitle data to another format. When selecting this function all of the corresponding parameters will be available in the parameters' list.
SUBTITLES [ Import / Create ]
When selecting this function, all of the headers for the parameters' categories will be color coded in BLUE, and display only the parameters to modify the imported data which will be dynamically available.
IMPORT SETTINGS
Imput Format : Allows you to select the subtitle text format you are importing. –If the format selected does not match the format of the text imported, then the subtitles will not be decoded as expected and they simply wont be displayed.
Formats available for input : SRT, SBV, Script File, FCPX Markers, FCP 7 Markers, UserTC and Adobe Premiere Pro Markers (CSV)
Text Input : This is where the text can be typed, edited or imported.
Make sure that the Input Format selection matches the Text Input format you are importing.
You can import SubRip SRT, YouTube SBV, Script File (used by Adobe Encore), Final Cut Pro XML Markers, Final Cut Pro 7 Marker Data, User Time Coded (SUGARfx) formatted text and Adobe Premiere Pro Markers in CSV format.
To import text, simply open the Text Editor and import the file from your computer. – See all of the addendums at the end of this file for more information about importing different formats.
The User Time code format have to follow a simple typing structure in order to be decoded properly by Subtitles for accurate placement in the timeline.
The format is very simple and easy to type. For more detailed information see the addendum at the bottom of this help file: Text Preparation > User Time code Format.
[ Markers ] Additional workflow options include the import of XML files created using the markers in Final Cut Pro X and Adobe Premiere Pro in CSV format. – The markers need to be exported from the host application first, and then imported into the Subtitles plugin using the Input Text parameter.
See the addendum: Markers : Subtitles 4 in FCPX and Markers > Using Adobe Premiere Pro for more information.
MAIN SETUP
Position : Sets the position of the subtitle text anywhere on screen. You can also use the OSC guides provided when the Info parameter is enabled.
Drop Frame : This button will adjust the processing and display of your subtitles accordingly.
Keyable : Makes the background transparent and ready for compositing.
TEXT SETTINGS
Font : Allows the selection of any font installed in your system.
Text Color : Color of the subtitles’ typeface.
Size : Controls the size of the subtitles text.
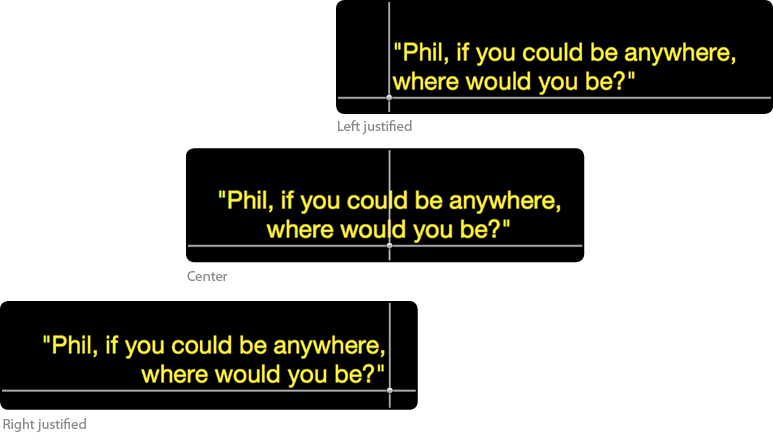
Justification : Drop down menu with the options to have the text Centered, Right or Left justified.
Keep in mind that the point where the OSC guides cross each other is the anchor point or reference point for the justification.
Vertical Align : The text can be aligned in 3 different ways (Center, Top and Bottom), depending how you want the text to be displayed when the subtitle is a multi-line subtitle.

Keep in mind that the point where the OSC guides cross each other is the anchor point or reference point for the vertical alignment.
TEXT APPEARANCE
Text Appearance : Drop down menu that provides 3 options to display the subtitle text. These are Fill only, Fill with Stroke and Fill with Shadow.
Note : Some fonts may cause undesirable spikes when using a Stroke. Our suggestion is to change the font for an alternate one or change its weight. –Most fonts that generate spikes may have very sharp square corners in their character glyphs, and by using an alternate font with more delicate corners, the spiking may go away or diminish in size.
Stroke-Shadow : Color well that provides the color for the Stroke and the Shadow.
Stroke-Shadow : Slider that controls the thickness of the Stroke when the stroke is enabled, or controls the shadow orientation when the shadow is selected.
TEXT SPACING
Line Spacing : Slider that controls the separation or spacing between the lines of text. Use 50 as a default value for most typefaces.
Kerning : Controls the separation between the letters of each subtitles text.
Margin : Adjustment of the margin of the subtitles text.
Leave this parameter as low as possible and only adjust it when there is a lot of text in the subtitles that goes beyond the side margins.
TEXT BOX
The Text box is the background box behind the text, commonly used when you want to frame the subtitle text to make it even more readable.
Color : The color of the Text Box.
Intensity : Controls the opacity of the text box.
Offset [ sides ] : Adds an additional margin between the text and the border of the text box sideways.
Offset [ vertical ] : Adds an additional margin between the text and the border of the text box in the vertical direction.
TIME
Auto Duration [ Markers ] : This parameter is available only when the Final Cut Pro X or FCP 7 Markers import format has been selected.
Since the markers can be created with or without duration in both applications, the Auto Duration parameter provides a calculation method to determine the duration of the markers that were created without a set duration.
Use this parameter only if you see that your markers without a set duration display too fast.
This value calculates the duration depending on the total number of characters in the subtitle text.
A recommended value for latin characters is between 15 to 25. –The lower the value the shorter the display duration, so you may need to adjust according to the display duration of your markers.
See the addendum at the end of this file: Markers > Using Final Cut Pro X for more information.
Time Offset : Drop down menu that allows the selection between Frames or Timecode to be used as the unit for offseting the time of the subtitles.
Use this parameter only when there is a discrepancy or offset between the dialog and the display of the subtitles.
Out of synchronization may happen due to several variables, such as the movie starting at a different time code than the time code in the subtitle data. – Use this parameter to compensate.
Frames [ Offset ] : Enter the number of frames that needs to be offset if the subtitles need to be adjusted only on a specific time in the timeline. The maximum value for this parameter is 900 frames in the positive and negative direction.
Timecode [ Offset ] : This parameter allows you to enter a specific time in time code format. This option allows only positive values.
Enter the time code using a period as a separator, like this example: 00.10.05.12
EXPORT [ Data Exchange ]
When selecting this function, all of the headers for the parameters' categories will be color coded in RED, and only the parameters to Export the data will be available.

This section guides you through the export process by labeling the Steps that you need to follow in order to export correctly and in the format that you want.
DATA EXCHANGE
Imput Format : Allows you to select the subtitle text format you are importing. –If the format selected does not match the format of the text imported, then the subtitles will not be decoded as expected and they simply wont be displayed or exported correctly.
Formats available for input : SRT, SBV, Script File, FCPX Markers, FCP 7 Markers, UserTC and Adobe Premiere Pro Markers (CSV)
Text Input : This is where the text can be typed, edited or imported. Make sure that the Input Format selection matches the Text Input format you are importing.
Auto Duration [ Markers ] : This parameter is available only when the Final Cut Pro X or FCP 7 Markers import format has been selected.
STEP 1
The first step in the export process is to let the plugin knows where to save the file and the name of the file. This information will be displayed in the main viewer if you have the Info button enabled.
Choose Folder : Click on the grey box or the Choose button to select the location in your hard drive where you want to save the exported file.
File Name : Click on the grey box or the Edit button to type the name of your file. –Do not type any file extension or any strange characters in here.
STEP 2
The second step in the export process gives you the option to select the Export File Format and finally execute the export command.
Export File Format : This is a Drop down menu that allows the selection to which you want to export the current subtitle data.
The formats available for Export are the following : SRT, UserTC, Script File (Adobe Encore), STL (DVD Studio Pro), FCPX Markers (in fcpxml format) and Premiere Pro (in XML format).
Export File ( Click to Export File) : This button allows you to export the file to the location specified in step 1, with the file name specified in step 1 and in the File Format selected in Step 2 (above).
Press this button to save the file. If this button is not pressed, the file will not be saved. (Sometimes the saving may be a bit stubborn, therefore you may need to press this button one more time until you see the file saved to disk).
Note: If you want to do additional exports in other formats, simply go back to Step 2 and select a new File Format, then press the Click to Export File button again to save a new file in the new selected format.
Technical Support
Our Technical support team is available to answer your questions via e-mail and should respond as soon as possible. (support @ sugarfx . tv)
Help
The Help file (or the PDF version of this User Manual) is available when you open the FxFactory application and press on the Help button under the icon of the theme element.
Support
Please visit our web site (http://www.sugarfx.tv) for possible answers to your technical support issues, or visit our YouTube channel at (http://www.youtube.com/sugarfxtv) where you may also find a tutorial that will help you find the answer to your question.
We do our best to test our products as thoroughly as possible and using multiple scenarios before releasing a new version to the general public, however we know that there is an infinite number of system configurations out there, with a great deal of different movie formats and multiple uses of our plugin that it is impossible for our team to cover every single instance in our testing, therefore we apologize in advance if the plugin is not behaving as expected while using it in your current configuration, video cards, system extensions or movie formats.
In order to solve any problems that you may encounter while using our Subtitles product, we ask you that you send us screen shots of the problem, the actual project in XML or any format that we can read, as well as contacting our friends at FxFactory through their Application and making sure your system profile is attached for inspection.
Known Issues
(1) When using the Export function that displays the red color coded parameters and saving the project, the next time you open the project, the blue color coded parameters may be displayed instead. –If this happens, simply select the function that you want to use and all of the parameters will be displayed correctly once again.
(2) When exporting a file, some systems may require that you press the Click To Export File one more time before the file is actually exported to your hard drive.
(3) Some fonts may display undesired spikes when using large stroke values. If this happens to your subtitles, you may need to choose an alternate font or the same font with a different weight to minimize or avoid the spiking.
There are no more issues that we are aware of, at the time of release of this product.
Don't have it yet? - Download and Try.
You can download and install the free trial as part of FxFactory.

|
|
© Copyright 2014 SUGARfx |


![]()
Tutorials
![]()
Works In:


